

The difference between a flawless, factory-smooth cabinet finish and a streaky, peeling mess often comes down to one thing: your equipment. Many homeowners invest in quality paint but then use amateur-grade supplies, leading to a finish that looks cheap and fails quickly. Navigating the hardware store can be overwhelming, but getting this part right is not optional. This is where you separate a professional job from a DIY disaster, and having the right tools for painting cabinets is the most vital factor.
Cabinet Painting Service Areas in Lafayette CO, Boulder CO & Surrounding Cities, Cabinet Refinishing in Boulder County, CO
Cabinet Painting in Boulder County & Northern Colorado
Brighton, CO, and Broomfield, CO.
Including Superior, CO, Louisville, CO, Niwot CO,
Lafayette, CO, Erie, CO, Firestone, CO,
Frederick, CO, Longmont, CO, Loveland, CO,
We also service projects throughout the entire state of Colorado.
This is not a list of suggestions. This is the professional’s checklist. We are cutting through the confusion to give you a no-nonsense guide to the exact equipment we use to achieve durable, beautiful results. We will explain what is absolutely essential, what is nice to have, and why using the right tool for each step-from prep to final coat-is critical for a finish that lasts. Stop guessing and start preparing for a result you can be proud of.
Key Takeaways
-
A factory-smooth finish is impossible without the right prep work. We detail the essential surface preparation tools that guarantee your paint will last.
-
Your choice of a brush, roller, or sprayer directly impacts the final look. Understand the pros and cons of each to select the right applicator for your project.
-
A professional job requires more than just paint. This checklist includes all the essential workshop tools for painting cabinets that prevent mistakes and ensure a clean process.
-
Flawless reassembly is the final step to a professional-grade result. Learn which tools are needed to reinstall hardware perfectly without damaging your new finish.
Table of Contents
Prep is 90% of the Job: Your Essential Surface Preparation Tools
Anyone can buy a can of paint, but a professional finish that lasts for years comes from meticulous preparation. This is the most critical stage of the entire process. Amateur house painters and DIYers often rush this step, which is why their work peels, chips, and fails within a year. A durable, factory-like finish is built on a perfectly prepared surface. There are no shortcuts to quality.
To understand the level of detail required, watch this overview of the professional cabinet painting process:
Achieving a flawless foundation requires specific equipment. The right tools for painting cabinets are not just about the sprayer or brush; they are about what you do long before the first coat of primer is applied. Here is the essential gear for stripping, cleaning, and sanding your surfaces perfectly.
Cleaning and Degreasing Supplies
Years of cooking oils, grease, and grime must be completely removed. Paint will not stick to a contaminated surface. Professionals use powerful cleaners to ensure the wood is sterile before sanding.
-
Trisodium Phosphate (TSP): A heavy-duty degreaser that cuts through the toughest kitchen grease. A strong TSP substitute is also effective.
-
Lint-Free Rags: For applying cleaners and wiping surfaces without leaving behind fibers that ruin the finish.
-
Scrub Pads: Abrasive pads to work cleaner into wood grain and detailed profiles, removing stubborn spots.
-
Denatured Alcohol: Used for a final wipe-down to remove any remaining residue and cleaner, leaving a perfectly prepped surface.
Sanding Equipment for a Smooth Canvas
Sanding does two things: it smooths imperfections and it creates a microscopic "tooth" for the primer to grip tenaciously. This is one of the most important collections of tools for painting cabinets a professional owns.
-
Random Orbital Sander: The pro’s choice for quickly and evenly sanding flat surfaces like doors and panels without leaving swirl marks.
-
Sanding Sponges: Flexible sponges are essential for sanding curved or detailed profiles on cabinet doors and frames.
-
Multiple Sandpaper Grits: A sequence is required. Typically 120-grit to start, followed by 180-grit and a final pass with 220-grit for a glass-smooth surface.
-
Shop Vacuum with Brush Attachment: Dust is the enemy of a smooth finish. A powerful shop vac removes all sanding dust from the surface and the work area.
Masking and Protection Tools
A professional job means your home is left spotless. Protecting surrounding surfaces is not optional. Before you even think about application tools like a high-quality sprayer or Paint roller, a professional ensures the entire work area is sealed off from dust and overspray.
-
High-Quality Painter’s Tape: Brands like FrogTape or 3M Blue create sharp lines and prevent paint from bleeding underneath.
-
Masking Paper or Plastic: Used to completely cover countertops, backsplashes, floors, and appliances.
-
Liquid Mask: For cabinets with glass panes, this paint-on film is a professional alternative that creates a perfect seal and peels off easily.

The Application Arsenal: Brushes, Rollers, and Sprayers
After meticulous preparation, the quality of your cabinet refinishing job comes down to application. The tools you use to apply the paint directly determine the final look and feel of your cabinets. While a DIYer might grab any brush, a professional understands that the choice between a brush, roller, or sprayer is critical. Each has its place, but only one delivers a true factory finish.
Choosing the Right Paint Brush
Do not compromise on your brush. A cheap brush will ruin your finish by leaving bristles in the paint and creating visible stroke marks. We use a high-quality 2-2.5" angled sash brush with soft bristles. For modern water-based cabinet coatings, a nylon/polyester blend is the correct choice. Even when we primarily spray, a quality brush is essential for cutting in tight corners where a sprayer can’t reach.
The Best Rollers for a Brush-Mark-Free Finish
Rollers can be effective for cabinet frames and large, flat door panels if you use the right kind. A 4-6" mini roller is the ideal size. The key is the material:
-
High-density foam rollers provide a spray-like, smooth finish.
-
Mohair or velour rollers also leave a very fine, lint-free surface.
Avoid standard wall-painting rollers. Their thick nap is designed for drywall and will leave an orange-peel texture on your smooth cabinet surfaces, a sure sign of an amateur job.
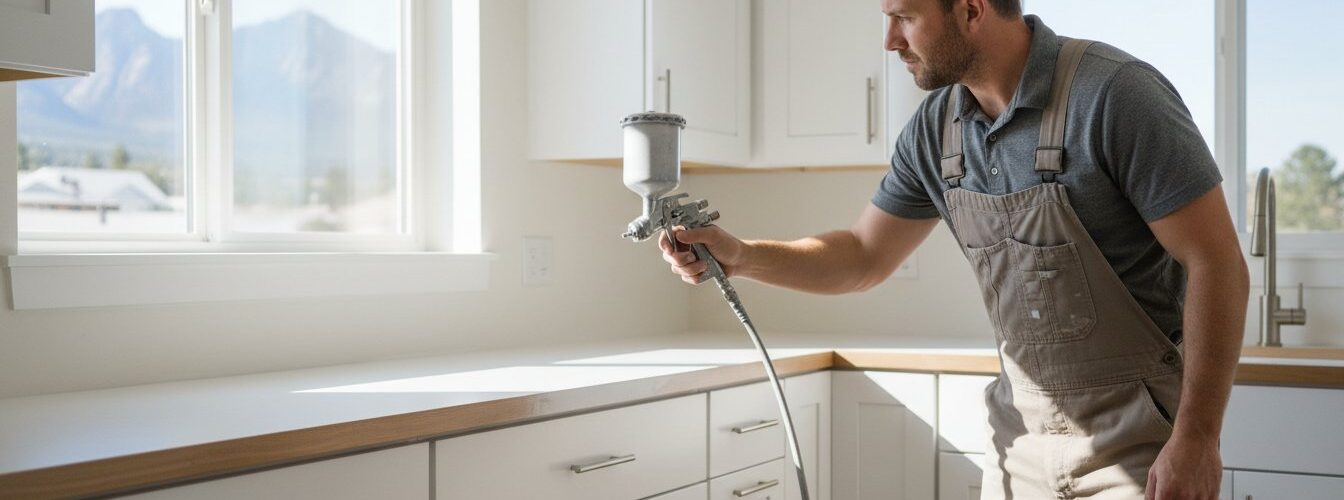
The Professional’s Secret: HVLP and Airless Sprayers
Here is what separates a professional cabinet refinishing job from all others: the sprayer. The best tools for painting cabinets for a flawless result are professional-grade sprayers. We use HVLP (High Volume, Low Pressure) sprayers, which atomize the paint into a fine, consistent mist. This process creates an incredibly smooth, durable, and even coating that is impossible to replicate by hand. It’s the secret to a true "factory finish."
Airless sprayers are another professional tool, valued for speed, but HVLP systems provide superior control for fine-finish work. Mastering these sprayers involves a significant learning curve and proper setup, which is why a homeowner’s project rarely matches the quality achieved by a seasoned professional.
The Supporting Cast: Workshop Essentials You Can’t Forget
A professional finish depends on more than just the paint and sprayer. Many DIY guides fail to mention the workshop essentials that make the job efficient, safe, and successful. These supporting items are the most overlooked tools for painting cabinets, and they are what separate a true craftsman from an amateur house painter. A proper setup protects your home from dust and overspray and is a vital factor in achieving a flawless, durable finish.
A Stable Workspace for Doors
Working on the floor is a recipe for back pain and a poor-quality finish. A professional setup is built for efficiency and reduces the chance of costly mistakes. Key items include:
-
Sawhorses or a sturdy workbench: Allows you to prep and paint doors at a comfortable, ergonomic height.
-
Painter’s pyramids or triangles: These elevate doors off the work surface, letting you coat edges and faces in one pass for a seamless finish.
-
Professional drying racks: Absolutely essential for safely curing multiple doors and drawers at once without smudges, drips, or damage.
-
A quality drill with bits: For the quick and clean removal and re-installation of all hinges, knobs, and pulls without stripping screws.
Proper Lighting and Ventilation
You cannot fix what you cannot see. Professional-grade lighting is non-negotiable for spotting drips, runs, and thin spots before the paint cures. Proper ventilation is just as critical. It protects your health from fumes and helps the finish cure correctly by managing airflow. A professional always controls their environment with:
-
Bright, portable work lights: Position them to eliminate shadows and inspect surfaces from all angles.
-
Box fans and open windows: To create cross-ventilation that safely exhausts solvent fumes away from your living space.
-
A contained painting area: A garage or a temporary, plastic-tented zone is used to control dust and contain overspray.
Essential Personal Protective Equipment (PPE)
Safety is not optional. The chemicals in high-quality primers and topcoats are harsh, and a real professional respects the materials they work with. The following PPE is mandatory for any serious cabinet refinishing project:
-
Respirator: A dual-cartridge respirator with organic vapor cartridges is a must, especially when spraying.
-
Safety glasses or goggles: To shield your eyes from chemical splashes and airborne dust particles during sanding.
-
Nitrile gloves: To keep harsh solvents and paints off your skin.
Assembling all the necessary tools for painting cabinets, including these workshop essentials, is a significant investment. It is this level of preparation that guarantees a durable, factory-quality result. If you want the job done right without the hassle, contact the experts at Cabinet Refinishing Boulder.
Finishing Touches: Tools for a Flawless Result
The painting is done, but the job is far from over. The final reassembly and detailing stage is what truly separates a professional, factory-quality finish from a rushed, amateur job. The right finishing tools ensure every door hangs perfectly, every knob is aligned, and every seam is invisible. These are not optional supplies; they are the essential tools for painting cabinets that guarantee a durable and polished result that will stand the test of time. A true professional considers every last detail, and that requires a specific set of tools.
Caulking and Filling for a Seamless Finish
Before any hardware is installed, the cabinet boxes must be perfected. This means addressing any remaining gaps or imperfections to create a smooth, monolithic appearance that looks built-in and custom. Don’t skip this step.
-
High-Quality Paintable Caulk: Use a flexible, paintable latex caulk to fill gaps between cabinet boxes, crown moulding, and walls. This creates a clean, seamless look.
-
Dripless Caulk Gun: Control is everything. A quality dripless gun prevents messes and allows you to lay a clean, precise bead without excess oozing.
-
Wood Filler and Putty Knives: For any last-minute repairs to dings or scratches that may have occurred during the process. A flexible putty knife is key for a smooth application.
-
Tack Cloth: A final, critical wipe-down of all surfaces to remove any lingering dust particles before doors are rehung is absolutely vital.
Precise Hardware Installation
Misaligned handles or knobs can ruin an otherwise perfect paint job. Professionals do not "eyeball" this critical step. Precision is mandatory for a clean, symmetrical look that functions correctly. Using the proper jigs and tools is the only way to ensure perfection across every single door and drawer.
-
Cabinet Hardware Jig: This is the most important tool for this step. A hardware jig is non-negotiable for drilling perfectly spaced and centered holes for knobs and pulls every single time.
-
Cordless Drill: A reliable drill with a full set of sharp bits prevents wood tear-out, while a driver bit set at the right torque prevents stripped screws.
-
Level: A small torpedo level is vital for the final check, ensuring every door and drawer front is perfectly plumb and level after installation.
Final Adjustments and Cleanup
The last 1% of the job is making sure everything functions as beautifully as it looks. These final tools for painting cabinets are about refinement and protecting your new investment.
-
Felt Bumper Pads: Place small, clear or felt pads on the inside corners of doors and drawers. This prevents the new finish from chipping and ensures a quiet, soft close.
-
Screwdrivers: A good set of screwdrivers is needed for the micro-adjustments on hinges to get perfect, even gaps between all doors.
-
Gentle Cleaner: Use a soft, lint-free microfiber cloth with a pH-neutral cleaner to wipe away any final fingerprints or smudges from the installation process.
This level of detail is what we provide on every project. Overwhelmed by the process? Let the pros handle it. Get your free estimate today.
Beyond the Checklist: Achieving a Flawless Cabinet Finish
As you can see, a professional cabinet transformation is about much more than just a can of paint. The secret to a durable, stunning finish lies in two key areas: meticulous preparation and the right application arsenal. From sanders and degreasers to high-quality sprayers, having the complete set of tools for painting cabinets is non-negotiable for achieving results that last. Mastering them is another challenge entirely.
Assembling this toolkit represents a significant investment in both time and money. One wrong step with a sprayer or improper surface prep can lead to chipping, peeling, and a finish you’ll regret. It’s the exact kind of costly mistake we see homeowners make when they hire general house painters instead of specialists for a detailed job.
With over 38+ years of experience, our team uses professional-grade spray equipment daily to deliver guaranteed, factory-like finishes. Leave the tools to us. Get a fast, free quote for a professional cabinet finish.
Your dream kitchen is closer than you think. Let us handle the hard work so you can enjoy the beautiful results.
Frequently Asked Questions About Cabinet Painting Tools
Can I use a regular house painting brush for cabinets?
No. A regular house painting brush is made for large, textured surfaces like walls and will leave heavy, ugly brush strokes on smooth cabinet doors. For a professional, factory-like finish, you need a high-quality, fine-bristle brush, like a 2.5-inch angled sash brush. Using the wrong brush is a classic amateur mistake that results in a streaky, low-quality finish that is very difficult to fix properly. Quality tools are not optional.
Do I really need an electric sander to paint cabinets?
Yes, an electric random orbit sander is a critical tool for proper cabinet preparation. While you can sand by hand, an electric sander guarantees a uniform scuff sand that properly de-glosses the old finish, which is vital for primer adhesion. It saves a tremendous amount of time and labor. Skipping this step or doing it improperly is the primary reason why DIY cabinet paint jobs often peel and fail within a year.
What’s the difference between an HVLP sprayer and an airless sprayer for cabinets?
An HVLP (High Volume, Low Pressure) sprayer uses air to atomize paint into a fine mist, giving you a smooth, glass-like finish with minimal overspray. It is the correct tool for detailed work like cabinets. An airless sprayer uses high pressure to force out paint, which is fast for walls but applies too much material for cabinets. This often leads to drips, runs, and an inferior finish. We exclusively use professional HVLP systems for a true factory finish.
Is it cheaper to buy all these tools or hire a professional cabinet painter?
For a one-time project, hiring a professional is almost always more cost-effective. The initial investment in quality tools for painting cabinets-a professional-grade sprayer, sander, and quality brushes-can easily exceed $1,000. This doesn’t include materials or the value of your time. More importantly, a professional has the experience to avoid costly mistakes that can ruin your kitchen cabinets. We bring the right equipment and expertise to guarantee a durable, flawless job.
What are painter’s pyramids and why are they so useful for cabinet doors?
Painter’s pyramids are small, pointed plastic stands used to elevate cabinet doors off your work surface. Their minimal contact point allows you to paint one side of a door, flip it over immediately, and paint the other side without smudging the finish or waiting hours for it to dry. This drastically speeds up the painting process and prevents the door from sticking to your drop cloth, which would ruin the fresh paint.
What kind of safety mask should I wear when painting cabinets?
A simple dust mask is not enough. You must use a dual-cartridge respirator. Use P100-rated cartridges to protect your lungs from fine sanding dust and organic vapor cartridges to protect you from the harmful VOCs (Volatile Organic Compounds) in primers and paints. Proper ventilation, such as using a box fan to exhaust fumes outside, is also critical. Your health and safety are not the place to cut corners on a job.

