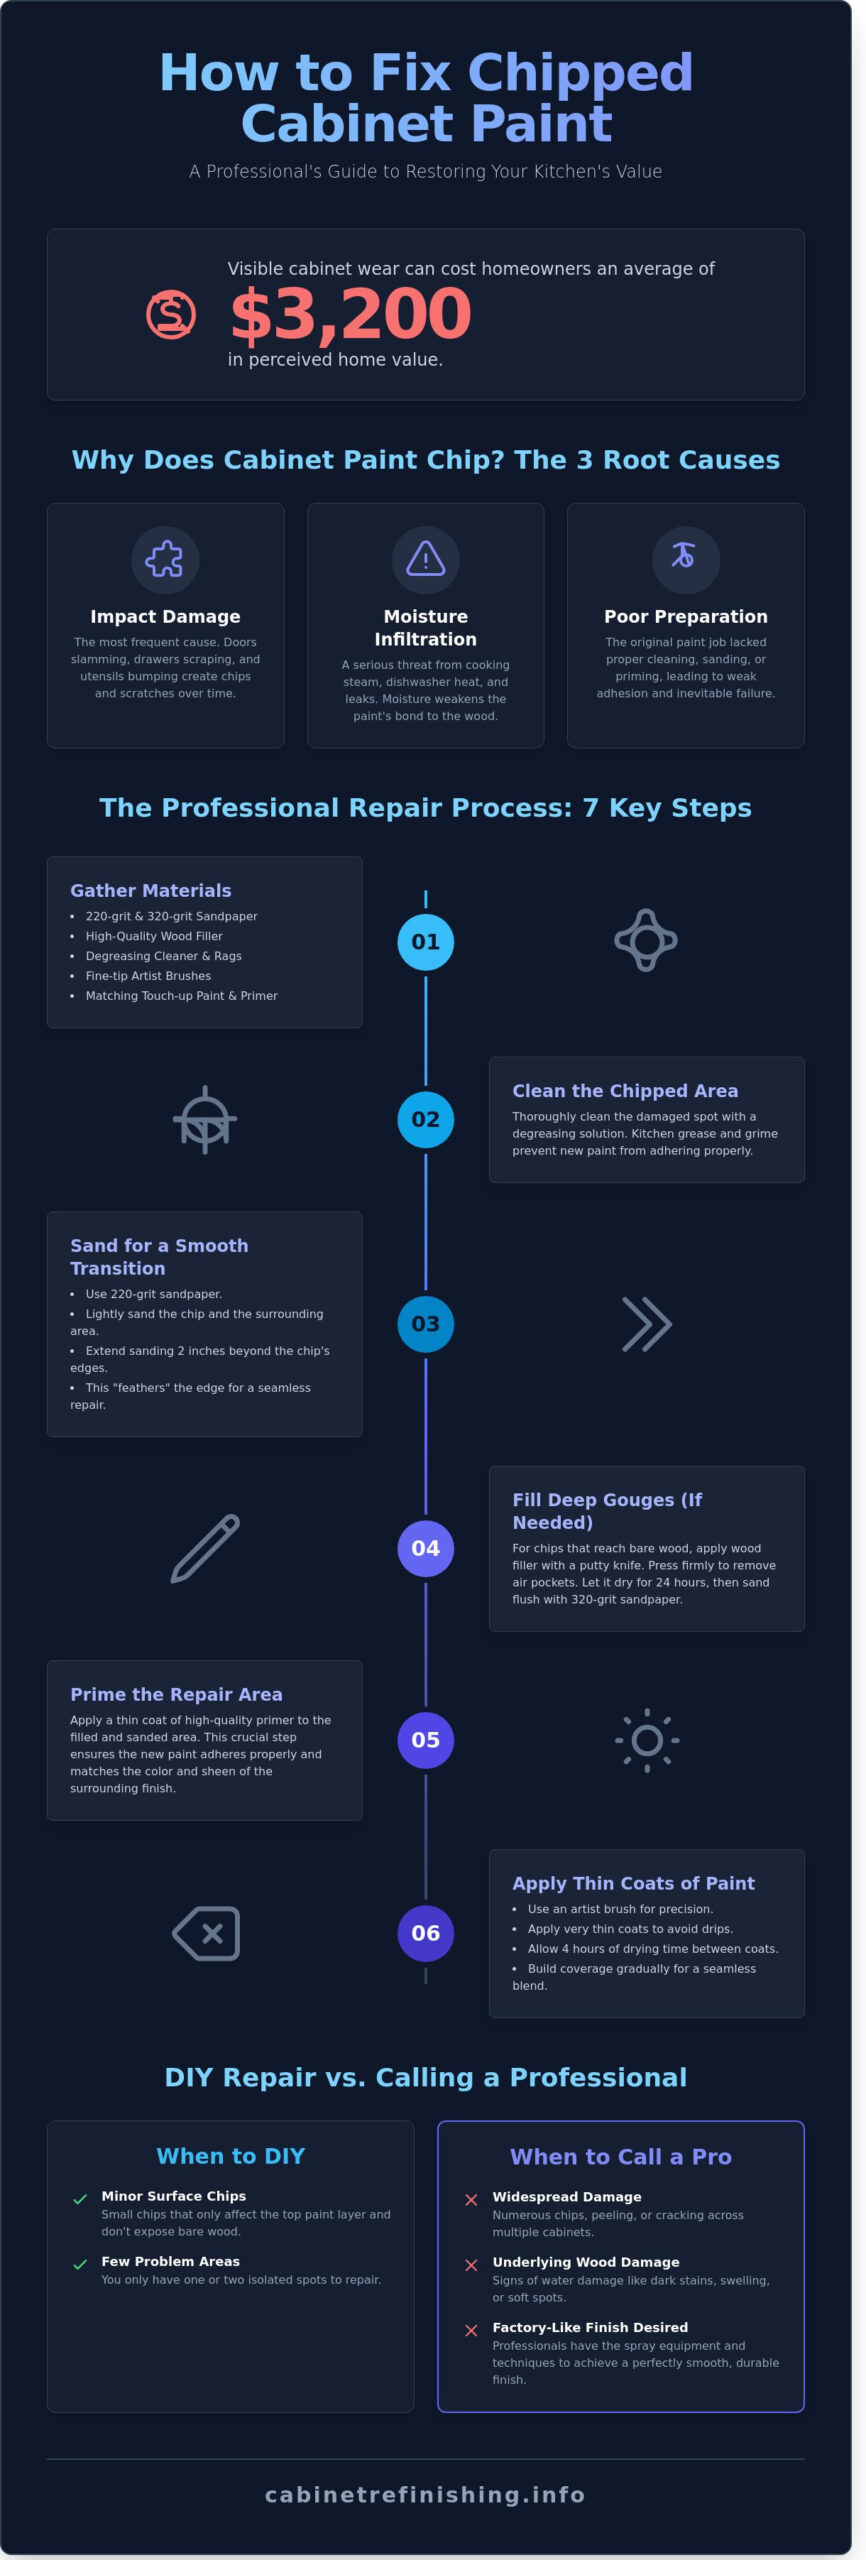
What if those unsightly paint chips on your kitchen cabinets are actually costing you thousands in home value every time a potential buyer walks through your door? Professional cabinet refinishers in the Boulder area report that homeowners lose an average of $3,200 in perceived home value when kitchen cabinets show visible wear and damage.
You’re not alone in feeling frustrated by chipped paint that makes your entire kitchen look dated and neglected. The good news is that learning how to fix chipped paint on kitchen cabinets doesn’t require a complete cabinet replacement or hiring expensive contractors. With the right preparation techniques and professional-grade materials, you can restore your cabinets to a factory-like finish that rivals brand-new installations.
This comprehensive guide will walk you through the exact step-by-step process used by cabinet refinishing professionals in Boulder, Lafayette, and surrounding Colorado communities. You’ll discover the critical preparation steps that separate lasting repairs from quick fixes that fail within months, plus the specific materials and techniques that ensure your repair work blends seamlessly with existing finishes for years to come.
Key Takeaways
- Learn how to fix chipped paint on kitchen cabinets using proper surface preparation, quality materials, and proven repair techniques that deliver professional-grade results.
- Discover the root causes of cabinet paint failure, including moisture damage and poor adhesion, so you can prevent future chipping and extend your cabinet finish lifespan.
- Master the essential tools and high-quality paint selection process that ensures seamless color matching and long-lasting durability for your cabinet repairs.
- Understand when DIY repairs are sufficient versus when professional cabinet refinishing expertise is necessary to avoid costly mistakes and achieve factory-like results.
Understanding the Causes of Chipped Paint on Cabinets
Before learning how to fix chipped paint on kitchen cabinets, you need to understand what causes the damage in the first place. Kitchen cabinets face constant stress from daily use, moisture exposure, and temperature fluctuations. Identifying the root cause prevents future problems and helps you choose the right repair approach.
Most paint failures happen for three primary reasons. Poor surface preparation during the original paint job creates weak adhesion between the paint and wood substrate. Impact damage occurs when cabinet doors slam shut or drawers are opened too forcefully. Moisture infiltration from cooking steam, dishwasher heat, or plumbing leaks weakens the paint bond over time.
Why Does Paint Chip? Common Reasons
Impact damage ranks as the most frequent culprit. Cabinet doors hitting adjacent surfaces, drawer fronts scraping against frames, and kitchen utensils bumping into painted surfaces create chips and scratches. Heavy pot handles swinging against lower cabinet doors cause particularly stubborn damage.
Moisture presents a more serious threat to paint integrity. Steam from cooking penetrates microscopic cracks in the paint film. Dishwasher vents release hot, humid air that condenses on nearby cabinet surfaces. Over months and years, this moisture exposure causes paint to lose adhesion and begin peeling.
Improper surface preparation during the initial painting process creates long-term problems. Cabinets painted without adequate cleaning, sanding, or priming develop poor paint adhesion. The paint film appears intact initially but starts chipping within 12 to 18 months of installation.
Evaluating the Damage on Your Cabinets
Start your inspection by examining each cabinet door and drawer front under good lighting. Look for water damage signs like dark staining, wood swelling, or soft spots around sink areas and dishwasher locations. These underlying issues must be addressed before any paint repair.
Categorize the damage severity to determine your repair strategy. Minor surface chips affecting only the paint layer require simple touch-up work. Deep gouges that penetrate through the paint into the wood substrate need more extensive preparation and priming.
Document problem areas with photos and measurements. This planning step helps you purchase the right amount of materials and estimate project time accurately. Pay special attention to high-traffic areas like cabinet doors near the sink, stove, and main work triangle where damage typically concentrates.
Temperature changes also contribute to paint failure. Kitchen environments experience daily temperature swings from cooking heat and seasonal HVAC variations. These cycles cause wood and paint to expand and contract at different rates, eventually creating stress cracks and adhesion loss.
Step-by-Step Guide to Fix Chipped Paint on Cabinets
Learning how to fix chipped paint on kitchen cabinets requires the right tools and systematic approach. Professional cabinet refinishing specialists in Boulder and Denver use proven methods that deliver lasting results. Here’s the exact process for repairing damaged cabinet paint.
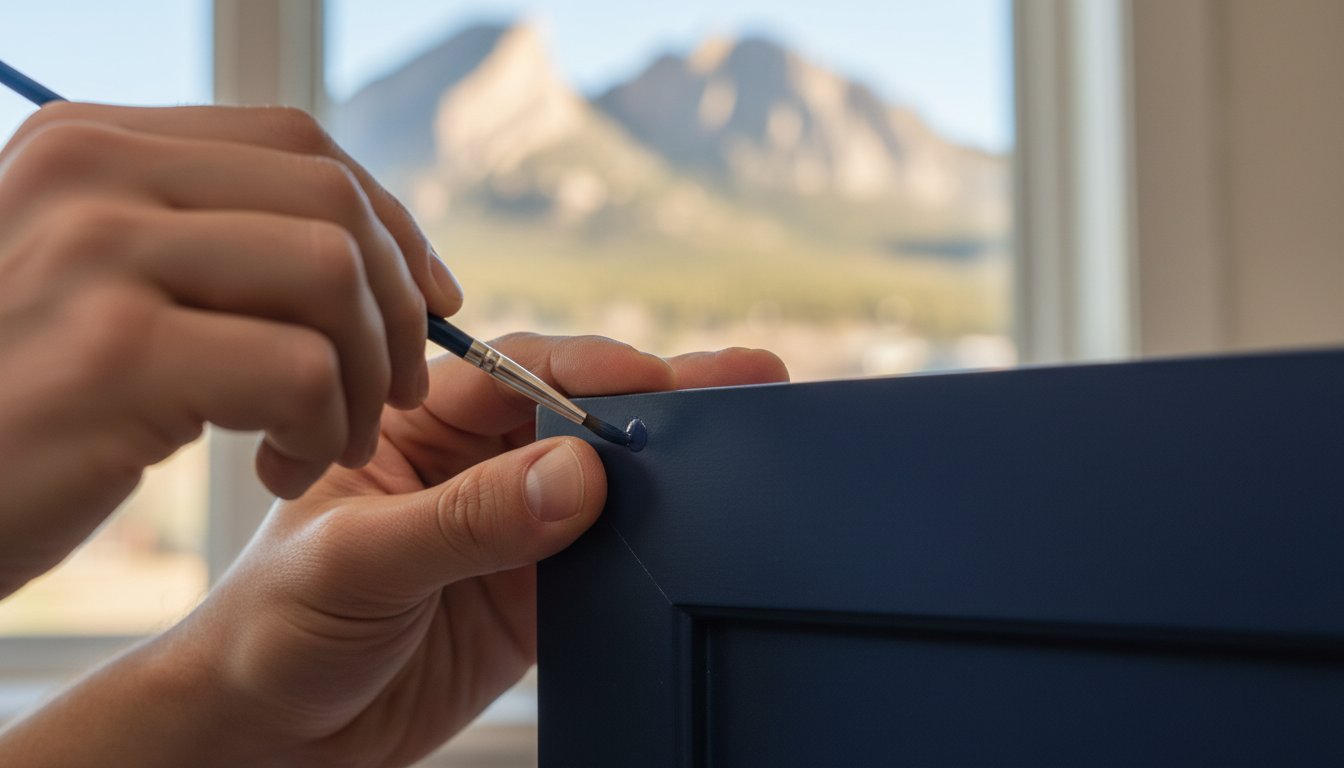
Start by gathering essential materials: 220-grit sandpaper, matching touch-up paint, fine-tip brushes, wood filler, and clean rags. Quality preparation prevents future chipping. Professional cabinet painters in Lafayette and Arvada always emphasize this critical first step.
Clean the chipped area thoroughly with degreasing solution. Kitchen cabinets accumulate grease and grime that prevents proper paint adhesion. Sand the damaged area lightly, extending 2 inches beyond the chip’s edges. This creates a smooth transition zone for the new paint.
For deeper gouges or chips extending to bare wood, apply wood filler using a putty knife. Press firmly to eliminate air pockets. Allow 24 hours drying time before proceeding. Sand the filled area flush with surrounding surfaces using 320-grit sandpaper.
Preparing Your Work Area
Remove cabinet doors and drawers when possible for easier access. Protect countertops, floors, and appliances with plastic sheeting. Proper ventilation prevents paint fumes from accumulating. Position bright LED work lights to illuminate the repair area clearly. Professional cabinet refinishing in Broomfield requires this level of preparation for quality results.
Applying the Paint
Use artist brushes for precision work in tight spaces. Apply thin coats rather than attempting full coverage in one pass. Thick applications create drips and uneven texture. Allow 4 hours between coats in temperatures above 70 degrees Fahrenheit.
Match the original paint sheen exactly. Satin finishes require satin touch-up paint. Gloss differences become obvious under kitchen lighting. Apply 2-3 thin coats for complete coverage and durability.
Professional results require patience and proper technique. Each coat should be barely visible when wet. The final coat determines the repair’s longevity and appearance quality.
While DIY repairs work for minor chips, extensive damage often requires professional expertise. Cabinet refinishing specialists in the Denver area use spray application methods that create factory-smooth finishes impossible to achieve with brush touch-ups.
Choosing the Right Paint and Tools for Cabinet Repairs
When learning how to fix chipped paint on kitchen cabinets, selecting the right materials makes the difference between a patch job that fails in 6 months and a repair that lasts for years. Professional cabinet refinishers in Boulder and Denver rely on specific paint formulations and precision tools to achieve factory-like results.
High-quality paint isn’t optional for cabinet repairs. Standard wall paint lacks the durability needed for kitchen environments, where cabinets face daily contact, moisture, and temperature changes. Cabinet-grade paints contain specialized resins that create harder, more flexible films capable of withstanding 200+ door openings per week without chipping or wearing.
Paint Selection Tips
Matching existing cabinet finishes requires careful attention to both color and sheen level. Semi-gloss and satin sheens are most common for kitchen cabinets, with semi-gloss providing superior cleanability around sink areas. Test your color match on an inconspicuous cabinet interior before proceeding with visible repairs.
Low-VOC (Volatile Organic Compound) paints improve indoor air quality during application and curing. These formulations contain less than 50 grams of VOCs per liter, compared to 380+ grams in traditional paints. The reduced odor makes kitchen repairs more manageable for occupied homes.
Recommended Tools and Kits
Quality brushes ensure smooth paint application without visible brush marks. Synthetic bristle brushes work best with water-based paints, while natural bristles excel with oil-based formulations. Choose brushes with 2-inch to 2.5-inch widths for cabinet faces and 1-inch angled brushes for detailed areas.
Touch-up kits offer convenience for minor repairs but require skill to blend seamlessly. Professional cabinet painters often create custom touch-up solutions by mixing small quantities of the exact paint used during the original refinishing process.
Proper surface preparation tools are equally critical. Start with 220-grit sandpaper to smooth damaged areas, followed by 320-grit for final smoothing. Tack cloths remove dust particles that could create texture issues in the final finish.
Understanding how to fix chipped paint on kitchen cabinets successfully requires patience and the right materials. Professional results come from using cabinet-specific products rather than general household paints and tools.
Professional Tips for Long-Lasting Cabinet Repairs
Success with cabinet paint repairs depends on proper preparation and technique. Professional cabinet refinishers follow specific protocols that ensure repairs last 10-15 years or more. These proven methods separate amateur touch-ups from professional-grade results.
The foundation of any lasting repair starts with thorough surface preparation. Clean all grease, cooking residue, and dirt using a degreasing agent specifically designed for kitchen surfaces. Sand the damaged area with 220-grit sandpaper to create proper adhesion. Skip this step and your repair will fail within 6-12 months.
Quality primer is non-negotiable for cabinet repairs. Bonding primers create a chemical bridge between the existing finish and new paint. This prevents the common problem of new paint peeling away from the original surface. Professional cabinet painters in Boulder and surrounding areas always use high-adhesion primers on repairs.
Ensuring Strong Paint Adhesion
Surface contamination causes 85% of paint adhesion failures. Even microscopic grease films prevent proper bonding. Use tack cloths after sanding to remove all dust particles. Apply primer in thin, even coats rather than trying to cover everything in one thick application. This builds a stronger foundation for your topcoat.
Maintaining Your Cabinets Post-Repair
Regular maintenance extends the life of cabinet repairs significantly. Clean with pH-neutral cleaners weekly to prevent buildup that weakens paint bonds. Inspect door edges and high-wear areas monthly for early signs of chipping. Address small issues immediately before they require extensive repairs.
Professional-grade topcoats provide superior protection compared to standard latex paints. These specialized coatings resist kitchen grease, moisture, and daily wear. They’re formulated specifically for cabinet applications and cure to a harder, more durable finish.
Proper curing time is critical for lasting results. Allow 24-48 hours between primer and paint application. Full cure takes 7-14 days depending on humidity and temperature. Avoid heavy use during this period to prevent damage to the fresh finish.
When learning how to fix chipped paint on kitchen cabinets, remember that shortcuts always show. Professional cabinet refinishers invest time in proper preparation because it determines the repair’s longevity. Quality materials cost more upfront but prevent costly re-work later.
For extensive damage or multiple repairs, consider professional cabinet refinishing. Experienced contractors have the tools, materials, and expertise to deliver factory-quality results that last decades. Contact our cabinet refinishing specialists for a detailed assessment of your kitchen cabinet restoration needs.
When to Call a Professional for Cabinet Repairs
While learning how to fix chipped paint on kitchen cabinets can save money on minor touch-ups, some situations demand professional expertise. Recognizing when your DIY efforts aren’t sufficient protects your investment and prevents costly mistakes that could damage your cabinets permanently.
Recognizing When DIY Isn’t Enough
Multiple chipped areas across several cabinet doors signal a deeper problem with the original finish or application process. If you’ve attempted repairs twice without lasting results, the underlying issue likely requires professional diagnosis. High-end cabinetry with complex finishes, glazing, or specialty coatings needs experienced hands to maintain its value and appearance.
Large-scale damage covering more than 30% of a cabinet surface typically indicates finish failure that extends beyond simple chipping. Professional cabinet refinishers can identify whether the problem stems from poor surface preparation, incompatible products, or environmental factors like excessive moisture.
Finding a Reliable Cabinet Repair Professional
Research local cabinet refinishing services by checking their portfolio of completed projects and reading reviews from homeowners in your area. Look for contractors who specialize specifically in cabinet work rather than general house painters. Cabinet refinishing requires different techniques, tools, and materials than standard wall painting.
A qualified professional brings spray equipment for factory-smooth finishes, knowledge of proper surface preparation, and access to commercial-grade coatings that last longer than retail paint products. They also understand how to properly mask and protect your kitchen during the refinishing process.
For expert guidance on cabinet repair and refinishing in the Denver area, Cabinet Refinishing Boulder offers professional consultation to help you determine the best approach for your specific situation.
Professional services typically cost 60-70% less than full cabinet replacement while delivering results that can last 15-20 years with proper care. The investment becomes worthwhile when you factor in the time savings, superior finish quality, and warranty protection that experienced contractors provide.
Consider professional help when your kitchen cabinets represent a significant portion of your home’s value or when you lack the time, tools, or confidence to achieve professional-quality results. A consultation can often clarify whether repair or full refinishing makes the most financial sense for your situation.
Transform Your Kitchen Cabinets with Professional Results
Learning how to fix chipped paint on kitchen cabinets doesn’t have to be overwhelming. The key steps include proper surface preparation, choosing high-quality primer and paint, and applying thin, even coats for durability. Remember that thorough cleaning and light sanding create the foundation for paint adhesion that lasts.
While DIY repairs work for minor touch-ups, extensive chipping often signals deeper issues with the original finish. Professional cabinet refinishing delivers factory-like results through spray application techniques and commercial-grade coatings that homeowners can’t easily replicate.
Cabinet Refinishing Boulder brings over 45 years of experience to every project in Boulder, Lafayette, Arvada, and surrounding areas. Our meticulous preparation process and professional spray systems create smooth, durable finishes that transform kitchens without the cost and disruption of full replacement. Get a free consultation with Cabinet Refinishing Boulder to discover how professional refinishing can give your kitchen the upgrade it deserves.
Your kitchen cabinets can look brand new again with the right approach and expertise.
Frequently Asked Questions
What causes paint to chip on kitchen cabinets?
Kitchen cabinets chip primarily due to daily wear from opening and closing doors, moisture exposure from cooking and cleaning, and poor surface preparation during the original paint job. Heat from appliances and steam from dishwashers create expansion and contraction that weakens paint adhesion. Amateur paint jobs often skip proper cleaning and sanding steps, leading to premature failure within 2-3 years.
Can I use regular paint to fix chipped cabinet paint?
Regular wall paint won’t hold up to kitchen conditions and will chip again quickly. Cabinet repairs require specialized coatings designed for high-traffic surfaces, such as conversion varnish or catalyzed lacquer. These professional-grade finishes cure harder and resist moisture, grease, and daily handling better than standard latex paint.
How long does it take for cabinet paint to dry?
Professional cabinet coatings typically dry to touch within 4-6 hours but require 24-48 hours for full cure before normal use. Environmental factors like humidity and temperature affect drying times. Conversion varnish and catalyzed lacquer cure faster than traditional paints, often allowing cabinet use within 24 hours when applied correctly.
Is it better to repair or repaint chipped kitchen cabinets?
Small chips covering less than 10% of cabinet surfaces can be spot-repaired effectively. Extensive chipping, multiple damaged areas, or chips larger than a quarter indicate the need for complete refinishing. Professional cabinet refinishing costs 60-70% less than replacement and provides a factory-like finish that lasts 15-20 years when done properly.
How do I prevent paint from chipping on my cabinets?
Proper surface preparation prevents 90% of paint failures on cabinets. This includes thorough degreasing, sanding to create adhesion, and applying appropriate primer before topcoats. Use soft-close hinges to reduce impact damage and clean cabinets weekly with mild soap to prevent grease buildup that weakens paint bonds.
What tools do I need to fix chipped paint on cabinets?
Basic cabinet touch-ups require 220-grit sandpaper, degreasing cleaner, primer, matching paint, and fine brushes or foam rollers. However, achieving professional results when learning how to fix chipped paint on kitchen cabinets requires spray equipment, proper masking materials, and specialized cabinet coatings that aren’t available to consumers.
When should I consider hiring a professional for cabinet repairs?
Hire professionals when chips cover more than 15% of your cabinets, when previous DIY attempts have failed, or when you want a factory-quality finish. Professional cabinet refinishing includes complete preparation, spray application, and warranties on workmanship. Companies with 20+ years experience can match existing finishes and ensure repairs blend seamlessly with undamaged areas.


